October 19, 2006
Generate Data Access Layer Classes In Seconds
While working with the 3-tier applications, we have to write the code for the Data Access Layer (DAL) for most of the database related transactions.Assume that we have 25 tables, for each table if we want to write DML operations (like Insert, Select, Delete) then we have to spend most of time to write the same codes on 25 tables.
i have come across the tool called "MyGeneration 1.1.5.1", developed by the MyGeneration Software . Check it out.

MyGeneration Software
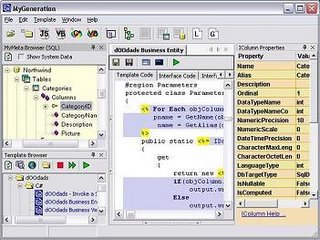
MyGeneration is a development tool written in Microsoft .NET. MyGeneration generates code from templates that can be written in C#, VB.NET, JScript, and VBScript. MyGeneration is for generating ORM architectures or O/R Mapping files for architectures such as Gentle.NET, and NHibernate. The meta-data from your database is made available to your templates through the MyMeta API. MyGeneration supports Microsoft SQL, Oracle, IBM DB2, MySQL, PostgreSQL, Microsoft Access, FireBird, Interbase, SQLite, VistaDB and Advantage. MyGeneration can generate code for non-Microsoft operating systems. MyGeneration installs with many sample templates that generate C# and VB.NET code, Stored Procedures, PHP, HTML. Adapt our templates or write your own to generate your particular architecture. MyGeneration also offers its own .NET architecture known as dOOdads, it's available in C# and VB.NET.
Version 1.1.5.1 features: GuiLabel has new Bold, Italic, and Strikethrough properties.
Download at :

October 18, 2006
Advanced JavaScript Editor
As a web developer, we know the importance of javascript for client side validations, working with images and forms. Except visul studio, not any other editors support javascipt debugging. But using visual studio also, it's not that easy to debug the javascript functions.i have come across the "JavaScript Editor" developed by the Yaldex Software, which provides the javascript function debugging a lot easier.

Yaldex Software
 1st JavaScript Editor is advanced JavaScript Editor, Validator and Debugger for beginners and professionals. Beside rich possibilities of editing scripts (JavaScript, HTML, CSS and syntax highlighting), program offers an excellent source code formatter / beautifier, which allows you to customize and apply any style you want. Built-in JavaScript Debugger will allow you run and debug the code, one line at a time. JavaScript Editor is used for professionally editing JavaScript code and creating animations and other special effects for Web pages using DHTML, CSS, Ajax, and JavaScript.
First JavaScript Editor can help you navigate through code using built-in 'Functions and Variables' navigator. Program uses Intellisense to simplify writing code and can highlight matching curly braces. Context help gives you access to over 2000 methods, properties. Unique library contains 200 controlled and 700 not controlled scripts. AJAX developers can easily use this program as advanced Ajax Editor. Version 3.7 may include unspecified updates, enhancements, or bug fixes.
Download at:

Graphical Tool for SQL Server administration
Microsoft SQL Server 2005 Express Edition doesn't provide you the Management tool. So if you want to use the management tool, you have to download the Management tool in order to use that, but it supports only for SQL Server 2005.I found out the new tool 'SQL Manager 2005', which is provided by the EMS Database Management Solutions.

EMS Database Management Solutions
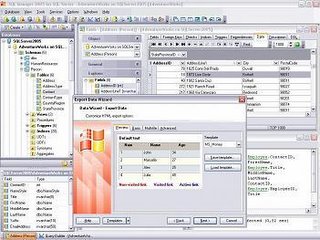 EMS SQL Manager for SQL Server is a powerful graphical tool for SQL Server administration and development. SQL Manager 2005 works with any SQL Server versions from 7 to 2005 and supports all of the latest SQL Server features including new SQL Server 2005 permission system, assemblies, DDL triggers, XML columns.
It offers plenty of powerful tools for experienced users such as Visual Database Designer and Visual Query Builder to satisfy all their needs. Version 2.5.0.1 may include unspecified updates, enhancements, or bug fixes.
Download at :

Develop ASP.NET Menu using UltimateMenu tool
Generally for displaying menu on web pages, we can use javascript or DHTML, but it doesn't provide you the server side functionality. In order to get the server side functionality for the menu, we can use tool like UltimateMenu. For example, if we want to display the data in menu which comes from database, hope that this one would be useful.
Karamasoft
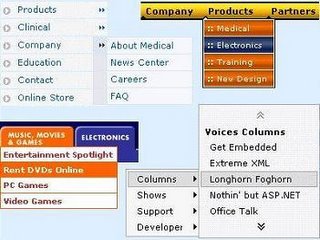 UltimateMenu is an ASP.NET menu control to build advanced DHTML menus. Visual Designer--fully integrated into VS.NET, also available as a stand-alone ASP.NET application. Frame support--full frame support without a single line of coding. User rights--display different parts of the menu based on user credentials. Data Binding--load menu from a data source as easy as setting a connection string. Professional style--pop-up, drop-down, vertical, horizontal, scrolling, filter, transition.
Show path--display both the menu traversal path, and the actual navigation path with different style. Client & server events--raise client-side and server-side events when user clicks on menu items. XML & CSS--menu structure and style based on XML and CSS industry standards. XHTML Support--fully compliant with XHTML. Cross-Browser support--IE5+, NS6+, Firefox 1.0+, Mozilla 1.0+, Opera 7.5+ for the best outcome, all down-level browsers with limited functionality.
Download at

October 17, 2006
Dynamically add controls to the Repeater control
Some times we have to add dynamic controls to the repeater (or) datagrid columns based on the conditions. For placing the dynamic controls, we need placeholder control in datagrid. You can think of a PlaceHolder control as an empty container to which you can add your controls. ASP.NET will remember the values for your dynamic controls; however, you do have to create the controls both on non-postback and postback calls. Once the controls are created in postback mode, ASP.NET will re-associate the posted data with the dynamic controls and repopulate the data automatically.This example has a table called Parameters that has the following fields to help you determine how to build the table:
| Field | Description |
| pkParameterID | Primary key |
| Prompt | Text to display next to control |
| DataType | Text field with the value 'String' or 'TF' in it (This will let you determine which control to show.) |
You also could add extra fields indicating whether the field was required, a minimum/maximum length, and so forth, but this example is designed to show just the use of the PlaceHolder control.
You then can create a simple form like this one:
<%@ Page Language="C#" AutoEventWireup="true"
CodeFile="test.aspx.cs" Inherits="test" %>
<!DOCTYPE html PUBLIC "-//W3C//DTD XHTML 1.0 Transitional//EN"
"http://www.w3.org/TR/xhtml1/DTD/xhtml1-
transitional.dtd">
<html xmlns="http://www.w3.org/1999/xhtml" >
<head runat="server">
<title>Untitled Page</title>
</head>
<body>
<form id="form1" runat="server">
<div>
<asp:Repeater ID="rptFields" runat="server">
<HeaderTemplate>
<table>
</HeaderTemplate>
<ItemTemplate>
<tr>
<td><%# Eval("Prompt") %>:</td>
<td><asp:PlaceHolder ID="plControl" runat="server" />
<input type="hidden" id="hdnFieldID" runat="server"
value='<%# Eval("pkParameterID") %>' /></td>
</tr>
</ItemTemplate>
<FooterTemplate>
</table>
</FooterTemplate>
</asp:Repeater>
<p align="center"><asp:LinkButton ID="btnSubmit"
runat="server">Submit Data</asp:LinkButton></p>
</div>
</form>
</body>
</html>
The code behind for this page looks like this:
public partial class test : System.Web.UI.Page
{
protected override void OnInit(EventArgs e)
{
base.OnInit(e);
rptFields.ItemDataBound +=
new RepeaterItemEventHandler(rptFields_ItemDataBound);
}
protected void Page_Load(object sender, EventArgs e)
{
Database db = new Database("(local)", "test", "sa", "dev1227");
AddControls(db);
db.Close();
}
private void AddControls(Database db)
{
DataTable dt = db.GetDataTableAdhoc("SELECT * FROM Parameters
ORDER BY pkParameterID");
rptFields.DataSource = dt;
rptFields.DataBind();
}
void rptFields_ItemDataBound(object sender, RepeaterItemEventArgs e)
{
if (e.Item.ItemType != ListItemType.Item && e.Item.ItemType
!= ListItemType.AlternatingItem)
return;
DataRow dr = ((DataRowView)e.Item.DataItem).Row;
PlaceHolder pl = (PlaceHolder)e.Item.FindControl("plControl");
switch (dr["DataType"].ToString().ToLower())
{
case "string":
TextBox txt = new TextBox();
txt.ID = "txtField" + dr["pkParameterID"].ToString();
pl.Controls.Add(txt);
break;
case "tf":
CheckBox chk = new CheckBox();
chk.ID = "chkField" + dr["pkParameterID"].ToString();
pl.Controls.Add(chk);
break;
}
}
}
As you see in the Page_Load routine, you need to load the dynamic controls every time—not just on the initial load of the page. I create an instance of my Database class, which encapsulates all my database code. Replace this with your favorite data access routine, but the sample uses a DataTable holding the contents of the Parameters table, which is bound against the Repeater control.
The ItemDataBound event does the bulk of the work here. It first determines that you are looking at an ItemTemplate (or AlternatingItemTemplate), and then it grabs the DataRow from the event arguments. This row holds the data type for the parameter, and a switch statement lets you get to the right area to add the right control. In each case, you instantiate a control of the appropriate type (TextBox vs. CheckBox) and then add it to the placeholder control (held in the pl variable). This causes the control to be displayed to the user.
If you wanted to give the control a default value, you'd need to check whether you were in postback mode prior to putting the value into the control or checking the box by default. If you didn't do this check, you'd essentially erase the user's input each time.
In the test page, you can type your data in and then press the Submit button. The Submit button will reload the page, which will show you that the values you typed in are repopulated automatically via the page's view state. This is a handy technique for building dynamic forms, especially those driven from user-configurable data.
Adding Multiple Checkbox Items to Datagrid for Selecting, Confirming and Deleting the Selected Data
As a .Net developer, we know the importance of the datagrid in web applications. In ASP days, we used to write the code to generate the data in table format and add bit of complex code for paging and sorting of the data.To avoid this much code and to make developer HAPPY, Microsoft came up with nice and cool control called Datagrid with minmum code and have the features like paging and sorting.
But some times we have to select the data from the datagrid then we process the data for modifying or deleting the data. So for that generally we add checkbox control to the for each row of the datagrid, so based on that we will select the checkbox for further processing of the data.
Here i am explaining the steps to add the checkbox to the datagrid and little of coding to select data for further processing.
In this article, we will examine how to create a fully functional DataGrid with all the features like seelctign the data for further processing. As an added bonus we'll be performing all of our data tasks strictly utilizing Microsoft's new Data Access Application Block or DAAB v2. To any who may feel a little behind with DAAB, have no fear, everything here can still be accomplished with pre-DAAB data objects as the only difference here is the data access part of it. Trust me there is a huge difference between the two, for one DAAB enable you to write about 75% less code that you would normally need when compared with regular ADO.NET!
So, before we begin, download the DAAB dll from the above link, install it, and copy it into you application's bin folder and you're ready to go. Also, be sure and take a peek at the DAAB documentation that came with your installation for an overview and any questions you may have.
Ok, let's get to it then.
Our fully-featured DataGrid
Selecting & deleting multiple items will definitely be set up quite differently than any other type of .NET DataGrid deleting you probably have seen. However, we'll still follow the same logical flow of deletion, and we'll still confirm any delete actions about to take place after we have selected all our items. Much of the magic in making this work is really going to come from client-side JavaScript, that is ultimately responsible for wiring up our main "select all" checkbox to handle the selecting and deselecting of our checkboxes. Also, included is our server-side delete method that erases our data, and a DataGrid refresher method to rebind our DataGrid after we have completed our data deletion.
Have a look at Figure 1 to get an idea of what your DataGrid will look like:
Figure 1
Here is the code to set up our DataGrid:
<form runat="server" ID="Form1">
<h3>Selecting, Confirming & Deleting Multiple Checkbox Items In A DataGrid </h3>
<br>
<ASP:DataGrid id="MyDataGrid" runat="server" Width="700" BackColor="white" BorderColor="black" CellPadding="3" CellSpacing="0" Font-Size="9pt" AutoGenerateColumns="False" HeaderStyle-BackColor="darkred" HeaderStyle-ForeColor="white">
<Columns>
<asp:TemplateColumn>
<HeaderTemplate>
<asp:CheckBox ID="CheckAll" OnClick="javascript: return select_deselectAll (this.checked, this.id);"
runat="server" />
<font face="Webdings" color="white" size="4">a</font>
</HeaderTemplate>
<ItemTemplate>
<asp:CheckBox ID="DeleteThis" OnClick="javascript: return select_deselectAll (this.checked, this.id);"
runat="server" />
</ItemTemplate>
</asp:TemplateColumn>
// ... Rest of our Custom Template & Bound Columns
</Columns>
</form>
The code listed above is what makes our DataGrid set up behave just like the grids on Hotmail and Yahoo. Our .NET DataGrid will have the same functionality and options available for selecting however many items, or perhaps all, that you'd like to delete, and once you do and submit, kiss them goodbye.
Selecting and De-Selecting our Checkboxes
Now that both checkboxes are wired to our multi-faceted JavaScript method, how is that one function going to determine the checkbox its dealing with, and the action it needs to carry out? Ah, here's how :-)
Our function select_deselectAll, listed below, accepts two arguments: the Checkbox's checked value, and its ID. Once this function is called, and its two arguments have been passed in, it'll begin looping through our form. Next, it begins performing some conditional checking utilizing JavaScript's indexOf method to locate the appropriate checkbox, and is based on both the values passed in, which it turn ultimately will give us one of several causes and effects:
If the main "select all" checkbox is checked, it will select all of the DataGrid checkboxes
If the main "select all" checkbox is unchecked, then all of the DataGrid checkboxes get unselected
Finally, if after the main "select all" checkbox is selected and all of the DataGrid's checkboxes are all checked, any one of those checkboxes gets unchecked, then the main checkbox is also unchecked. This way we don't end up having our checkbox's logic behaving inconsistently or erratically.
function select_deselectAll (chkVal, idVal)
{
var frm = document.forms[0];
// Loop through all elements
for (i=0; i<frm.length; i++)
{
// Look for our Header Template's Checkbox
if (idVal.indexOf ('CheckAll') != -1)
{
// Check if main checkbox is checked, then select or deselect datagrid checkboxes
if(chkVal == true)
{
frm.elements[i].checked = true;
}
else
{
frm.elements[i].checked = false;
}
// Work here with the Item Template's multiple checkboxes
}
else if (idVal.indexOf ('DeleteThis') != -1)
{
// Check if any of the checkboxes are not checked, and then uncheck top select all checkbox
if(frm.elements[i].checked == false)
{
frm.elements[1].checked = false; //Uncheck main select all checkbox
}
}
}
}
Figure 2 shows you the effect of the JavaScript above interacting with the DataGrid when selecting the top main "select all" checkbox.
Figure 2
Now, aside from this function allowing a quick full selection, you also have the option of manually selecting as many checkbox items as you wish. Next comes the tricky part in how to determine which ones were selected, and how to confirm this the instant you submit the form, and prior to actual deletion.
Confirming Multiple Deletes
In this section, we'll examine how to confirm multiple deletes when we submit our form. Below in Figure 3 you can now see the alert confirmation after selecting a couple of items, and then submitting the form by press the "Delete Items" button. The alert takes place at any time you submit the form (as long as you have more than one checkbox selected).
Figure 3
Note that this confirmation will alert with all checkboxes selected or a just a few as shown. Pressing the Delete Items button with none selected will not prompt any alert. Here now is how we determine what checkboxes are actually checked.
The first thing we did was set up our Delete Button at the end of our DataGrid; just a regular asp server button. We also wired a server-side event to it - DeleteStore - that, when confirmed, will delete the records:
<asp:Button Text="Delete Items" OnClick="DeleteStore" ID="Confirm" runat="server" />
But how does that pop-up alert confirmation appear? Well, that's the cool thing. We get this by adding the code listed below to our Button server control as soon as the page loads, in our Page_Load method, by locating it using the FindControl method and then adding to the button attributes, like so:
WebControl button = (WebControl) Page.FindControl("Confirm");
button.Attributes.Add ("onclick", "return confirmDelete (this.form);");
So, the second the page loads, it attached the Javascript handler to this button, and if you examine the HTML source code, the button afterwords, actually looks like this:
<input type="submit" name="Confirm" value="Delete Items" id="Confirm" onclick="return confirmDelete (this.form);" />
Cool huh? Now, the second this button is pressed, is when it can now trigger the client side JavaScript function below:
function confirmDelete (frm)
{
// loop through all elements
for (i=0; i<frm.length; i++)
{
// Look for our checkboxes only
if (frm.elements[i].name.indexOf("DeleteThis") !=-1)
{
// If any are checked then confirm alert, otherwise nothing happens
if(frm.elements[i].checked)
{
return confirm ('Are you sure you want to delete your selection(s)?')
}
}
}
}
Ok, what happening here? Well, the JS function above is, for all intents and purposes, not that different from the previous JavaScript function - select_deselectAll. Except, instead of determining if the main "select all" checkbox is checked, it actually checks to see whether if any of the DataGrid row checkboxes are checked. If so, it'll then, and only then, alert you with a confirmation to proceed onto either to delete or cancel.
Deleting Data
Now recall our asp:button above, and its default JavaScript onclick event handler attached on Page_Load. Aside from this we also notice it has another OnClick event (this one being server based) that gets raised when the button is clicked, rather pressed, that'll allow it to fire the server-side DeleteStore method to delete our data:
public void DeleteStore (Object sender, EventArgs e)
{
string dgIDs = "";
bool BxsChkd = false;
foreach (DataGridItem i in MyDataGrid.Items)
{
CheckBox deleteChkBxItem = (CheckBox) i.FindControl ("DeleteThis");
if (deleteChkBxItem.Checked)
{
BxsChkd = true;
// Concatenate DataGrid item with comma for SQL Delete
dgIDs += ((Label) i.FindControl ("StoreID")).Text.ToString() + ",";
}
}
// Set up SQL Delete statement, using LastIndexOf to remove tail comma from string.
string deleteSQL = "DELETE from Stores WHERE stor_id IN (" + dgIDs.Substring (0, dgIDs.LastIndexOf (",")) + ")";
if (BxsChkd == true)
{ // Execute SQL Query only if checkboxes are checked, otherwise error occurs with initial null string
try
{
SqlHelper.ExecuteNonQuery (objConnect, CommandType.Text, deleteSQL);
OutputMsg.InnerHtml += "<font size=4><b>Store information has been deleted.</b></font>";
OutputMsg.Style["color"] = "green";
}
catch (SqlException err)
{
OutputMsg.InnerHtml += err.Message.ToString(); //"<font size=4><b>An error occurred and the record could not be deleted</b></font>";
OutputMsg.Style["color"] = "red";
}
//Refresh data
BindData();
}
}
Since having wired the two client/server methods together, it's our JavaScript code that actually intercepts this button's call and goes first. If you confirm OK, then will the deleting server-side method execute, otherwise it'll cancel all events after that point and prevent anything from posting back.
Looking at the DeleteStore() method, you'll notice that it is actually does a few things. First, it set's up the string variable dgIDs that will hold all of our selected DataGrid IDs. Next, it loops through the DataGrid, and gathers all of the selected item ids that are based on the row's TemplateColumn ID, which is why I kept the ID control as a TemplateColumn and the rest BoundColumns as these types of controls do not support the ID property we need for referencing our data. After this, it will, upon verifying checked items, gather all the ids and assign them to our dgIDs variable, that'll be used with our SQL deleteSQL delete statement.
The deleteSQL delete statement uses the "WHERE IN" argument to perform the multiple deletes in one shot. Since we need to separate each id with a comma, you'll notice that in the loop I attach a comma after each collected item. This way we'll have all of our items clearly defined in our SQL. One problem however is that since we add on a comma after each collected item, the last one as well will include a tail-end comma and SQL won't like this. For example, once we loop through the DataGrid, gather up all of the selected items, and assign it to our delete string we could end up with something like this:
DELETE from Stores WHERE stor_id IN (2,4,6,7,)
Notice the last comma; that's a no-no. To quickly and easily remedy this, we must remove the last comma, and we do this by pulling the substring we need from the "dgIDs" string using LastIndexOf (",") effectively removing the last comma, and properly formatting the delete statement for SQL, like so:
DELETE from Stores WHERE stor_id IN (2,4,6,7)
Finally, DeleteStore proceeds to execute the query against the database. Incidentally, for those wondering why I have a conditional with BxsChkd? Well it's because if I don't initially select any items, I'm returned an error on Page_Load due to our SqlHelper having nothing initialized. Therefore, by do so, our DeleteStore method will remain silent, and happily waiting in the wings until it does get the actual go ahead.
So that's the crux of our DataGrid application, and technology behind doing multiple checkbox deletes.
October 15, 2006
How to debug T-SQL stored procedures
I will execute -- or step into -- a sample T-SQL stored procedure and assign values to input parameters, inspect variable contents, follow the logical flow of the procedure during runtime, evaluate T-SQL expressions, view the procedure's output, set breakpoints and generally examine the state of the environment. (Future tips will continue along this same theme.) We will debug our procedure, not from Management Studio but from the Visual Studio 2005 development environment. I mention this because under SQL Server 2000 we are able to debug stored procedures using Query Analyzer. Perhaps debugging capabilities will be added to Management Studio in the future.
- Sample stored procedure
- Where to start debugging the stored procedure
- How to step into or run the stored procedure
- Visual Studio debug windows
- Conclusions
Sample T-SQL stored procedure: P_DisplayProductDetails
Our sample stored procedure displays product details from the AdventureWorks database using a function to rank the unit price for each product subcategory. The procedure accepts the category name as an optional input parameter. Several output parameters feed useful information back to the calling batch.
Use AdventureWorks
GO
IF EXISTS (SELECT * FROM sysobjects WHERE type = 'P' AND name = 'P_DisplayProductDetails')
DROP Procedure P_DisplayProductDetails
GO
CREATE Procedure P_DisplayProductDetails
(@Categoryname varchar(50) = NULL,
@MatchingRows int = NULL OUTPUT,
@ErrorString varchar(128) = NULL OUTPUT,
@ErrorNumber int = NULL OUTPUT)
as
BEGIN TRY
-- Append a % so our callers don't have to know exact subcategory names
if @CategoryName is null
select @CategoryName = '%'
else
select @CategoryName = @CategoryName + '%'
-- Use a rank function to rank data by List Price over subcategory name
-- The DENSE_RANK assigns consecutive rank values
SELECT Production.Product.ProductID,
Production.Product.Name AS ProductName,
Production.ProductCategory.Name AS CategoryName,
Production.ProductSubcategory.Name AS SubcategoryName, Production.Product.ListPrice,DENSE_RANK() over (Partition by Production.ProductSubcategory.Name ORDER BY Production.Product.ListPrice DESC) as PriceRank
FROM Production.Product
INNER JOIN
Production.ProductSubcategory ON Production.Product.ProductSubcategoryID =
Production.ProductSubcategory.ProductSubcategoryID
INNER JOIN Production.ProductCategory ON Production.ProductSubcategory.ProductCategoryID = Production.ProductCategory.ProductCategoryID
WHERE Production.ProductCategory.Name like @CategoryName ORDER BY Production.ProductCategory.Name
select @MatchingRows = @@ROWCOUNT
return 0
END TRY
BEGIN CATCH
-- LOG THE ERROR … WE MAY WANT TO SKIP THIS STEP WHILE DEBUGGING !
insert dbo.Application_Error_Log (UserName, errorNumber, errorSeverity, errorState, errorMessage) values (suser_sname(), ERROR_NUMBER(),ERROR_SEVERITY(), ERROR_STATE(), ERROR_MESSAGE())
SELECT @ErrorNumber = ERROR_NUMBER(), @ErrorString = ERROR_MESSAGE()
RAISERROR (@ErrorString, 16,1)
END CATCH
Where to start debugging the stored procedure
Before any debugging can take place, you first must create the store procedure. This can be done either by using Management Studio/New Query or by building the procedure graphically in Visual Studio 2005. Stored procedures can be created in Visual Studio by opening a new database project and using the Visual Studio Installed Templates.
Either way, once the procedure exists, you are ready to start debugging from Visual Studio 2005. When you start up Visual Studio for debugging purposes, you don't have to create a project. Instead, you can create a connection to the AdventureWorks database from Server Explorer, as I have done in the screenshot shown in Figure 1. (You will have to provide your server name along with your login credentials and choose the AdventureWorks database.) Then you can drill down and open up the stored procedures folder. Next, right click on the procedure you wish to debug and choose Step Into Stored Procedure from the context menu. Then you are ready to start debugging!
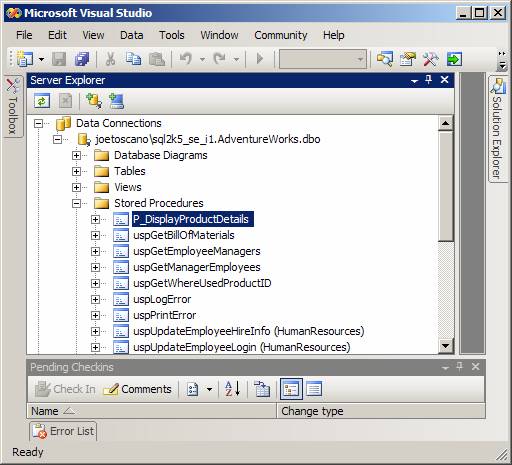
Figure 1: Where to start debugging in VS 2005
How to run the stored procedure
By stepping into the procedure, you are essentially telling Visual Studio to start running the procedure line by line. Since our sample procedure does accept input parameters, you will see a Local Window that allows you to scroll through the local variables and parameters of the stored procedure. In Figure 2 under the Direction column header, you'll notice that Visual Studio identifies the output parameters for you, and the Value column is the only column in this window you can change. In this case, I've supplied Bike as a CategoryName value.
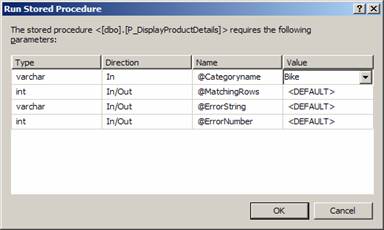
Figure 2: Output parameters
Visual Studio provides numerous windows in which to examine the state of the environment. The line of code waiting to be executed is identified by the yellow arrow in the screenshot in Figure 3.
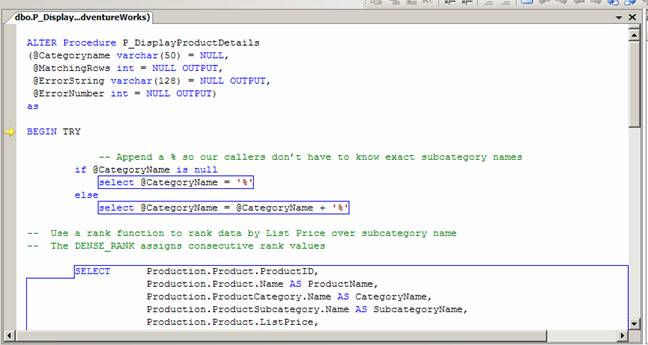 Figure 3: Code to be executed
Most of the time, you will Step Into or Step Over commands in your stored procedures. The commands below apply to a single T-SQL line:
- Step Into (F11): Use to single step through your code. (Move the yellow arrow down one statement.)
- Step Over (F10): Useful if you have lines of code that perhaps modify data or call other procedures that you don't care about while debugging. For example, you may want to skip code that performs auditing.
- Step Out (SHIFT-F11): Execute the rest of the stored procedure without pause.
- Run to Cursor (CTRL-F10): Position the cursor to a point in your code and then hit CTRL-F10 to execute all code up to that point.
- Continue (F5): Resumes execution until completion or until the next breakpoint (more on breakpoints in a minute).
Visual Studio debug windows
Visual Studio provides us with many informative debug windows. I'll walk through our sample code to review several of these windows, starting with the Autos window.
The Autos Window displays variables used in the current statement. When the yellow arrow points to the select @CategoryName = @CategoryName + '%' line of code, notice the value of @CategoryName is the value prior to the statement actually being executed. In this case, in Figure 4, we have yet to append a percentage to this parameter.
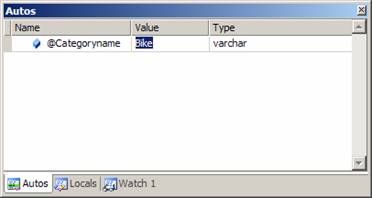
Figure 4: Autos window
The Locals window displays the current local variables and parameters and allows you to change the values of these variables interactively during code execution. This window color codes variable values that were changed. In Figure 5 you can see that I changed "Bikes" to "Clothing," and to identify this Visual Studio, I made this new value red.
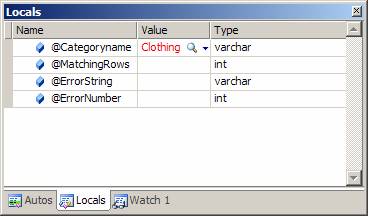
Figure 5: Locals window
The Watch 1 window allows you to type or drag from code the T-SQL Expressions to be evaluated in this window and see what the code actually evaluates. This may be useful if you want to investigate the values of expressions contained in conditional expressions, such as IF, WHILE or CASE. You can actually work with up to four watch windows.
The Output window displays the result set returned by select or print statements. In our example, we returned 35 matching "Clothing" rows (see Figure 6).
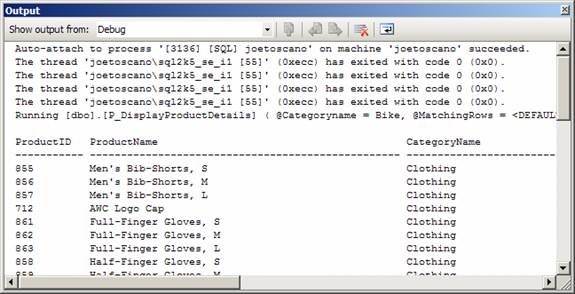 Figure 6: Output window
The Hovering Value window is not really a window, but it's a great feature worth pointing out. If you hover your cursor over your lines of code while in debug mode, you will see the values of variables associated with that particular line. This seems similar to the Windows application functionality in which you hover your cursor over a toolbar icon without clicking on it to get help.
The Breakpoints window displays your current breakpoints and allows you to add them. Breakpoints are user-defined code locations and/or conditions that pause execution, allowing the debugger to reflect, inspect and so on. You can add breakpoints by clicking to the left edge of the code window below, identified by the yellow arrow. Notice that the Breakpoints window in Figure 7 is actually divided into two windows. The lower window provides breakpoint information and tells us there is a breakpoint on line 20. The upper window of Figure 7 contains a code section. In this upper window we do see the red bubble to the left of line 20, which is Visual Studio's breakpoint indicator.
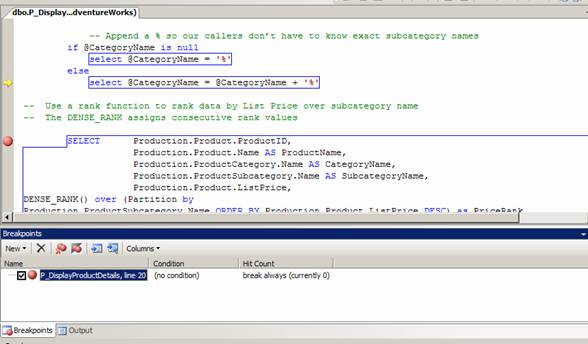 Figure 7: Breakpoints window
Conclusions
Visual Studio 2005 has easy-to-use graphical debugging tools for your T-SQL stored procedures. You may want to take advantage of this when unit testing your code. Since developers typically unit test code in the absence of all supporting cast procedures or functions, the Step Over option could really come in handy. Also, since you can easily change values of input parameters or local variables, you can force your program's flow down paths, which will exercise specific portions of code.
Tuning stored procedures: Structured exception handling in SQL Server 2005
Exception handling was widely thought to be one of the weakest aspects of T-SQL script writing. Fortunately, this has changed in SQL Server 2005, which supports structured error handling. This tip focuses first on the basics of the new TRY...CATCH constructs and then looks at some sample SQL Server 2000 and 2005 T-SQL that produces constraint violations using transactional code. Future tips will continue along this theme.TABLE OF CONTENTS
- Exception handling before
- Introducing TRY...CATCH
- Structured vs. unstructured exception handing
- SQL Server 2000 exception handling
- SQL Server 2005 exception handling
- Conclusions
Exception handling before
In previous versions of SQL Server you would handle exceptions by checking the @@error global variable immediately after an INSERT, UPDATE or DELETE, and then perform some corrective action if @@error did not equal zero. Oftentimes, developers would duplicate this unstructured code, which resulted in repetitive blocks of code, and combine it with GOTOs and RETURNs.
Introducing TRY...CATCH
Structured exception handing provides a powerful mechanism for controlling complex programs that have many dynamic runtime characteristics. It is a tried and true practice currently supported by many popular programming languages such as Microsoft Visual Basic .Net and Microsoft Visual C#. You will see in the examples below that utilizing this robust method will make your code more readable and maintainable. The TRY block contains transactional code that could potentially fail, while the CATCH block contains code that executes if an error occurs in the TRY block. If any errors occur in the TRY block, execution is diverted to the CATCH block and the error can be handled while error functions can be used to provide the detailed error information. TRY...CATCH has the following abbreviated syntax:
BEGIN TRY
RAISERROR ('Houston, we have a problem', 16,1)
END TRY
BEGIN CATCH
SELECT ERROR_NUMBER() as ERROR_NUMBER, ERROR_SEVERITY() as ERROR_SEVERITY, ERROR_STATE() as ERROR_STATE, ERROR_MESSAGE() as ERROR_MESSAGE
END CATCH
Notice the use of functions in the script above that we are able to use in place of local and/or global variables. These functions should only be used in a CATCH BLOCK and are explained below:
- ERROR_NUMBER() returns the number of the error.
- ERROR_SEVERITY() returns the severity.
- ERROR_STATE() returns the error state number.
- ERROR_PROCEDURE() returns the name of the stored procedure or trigger where the error occurred.
- ERROR_LINE() returns the line number inside the routine that caused the error.
- ERROR_MESSAGE() returns the complete text of the error message. The text includes the values supplied for any substitutable parameters, such as lengths, object names or times.
I'll first demonstrate a simple example with SQL Server 2000, followed by an example with SQL Server 2005 exception handling.
Structured vs. unstructured exception handing
Below is a simple example stored procedure to code using SQL Server 2000 and then 2005. Both procedures start with simple tables that do contain constraints our insert will violate. Here is the table schema:
create table dbo.Titles
(TitleID int Primary Key identity,
TitleName nvarchar(128) NOT NULL,
Price money NULL constraint CHK_Price check (Price > 0))
create table dbo.Authors
(Authors_ID int primary key identity,
au_fname nvarchar(32) NULL,
au_lname nvarchar(64) NULL,
TitleID int constraint FK_TitleID foreign key
references Titles(TitleID),
CommissionRating int constraint CHK_ValidateCommissionRating
Check (CommissionRating between 0 and 100))
create table dbo.Application_Error_Log
(tablename sysname,
userName sysname,
errorNumber int,
errorSeverity int,
errorState int,
errorMessage varchar(4000))
SQL Server 2000 exception handling
As you will see, this stored procedure contains the unstructured error handling we've used prior to the arrival to SQL Server 2005.
SQL Server 2005 exception handlingYou've seen the code used in P_Insert_New_BookTitle_2K before. The best you can say is, "At least I have exception handling." The statement below executes the SQL Server 2000 stored procedure.
exec P_Insert_New_BookTitle_2K 'Red Storm Rising',16.99,'Tom','Clancy', 200
When we execute the stored procedure with the provided parameters, the insert into the Authors table fails because of an invalid Commission Rating value. Our check constraint flags this invalid value and we see the following error:
Msg 547, Level 16, State 0, Procedure P_Insert_New_BookTitle, Line 23 The INSERT statement conflicted with the CHECK constraint "CHK_ValidateCommissionRating". The conflict occurred in database "Adventureworks2005", table "dbo.Authors", column 'CommissionRating'. The statement has been terminated.
The problem is that we could not stop this message from being sent to the client. So the burden of deciding what went wrong will be placed on the client. Sadly, in some cases, this may be enough for some applications to not use constraints.
Let's try this again but this time we'll use the TRY...CATCH .
SQL Server 2005 exception handling
In this new and improved procedure we see the TRY...CATCH block and structured error handling:
Notice the SQL Server 2005 exception handling code is much more streamlined and, therefore, more readable and maintainable. There's no cutting and pasting code of exception handling code and no GOTOs. You'll see the results below when executing this stored procedure:
exec P_Insert_New_BookTitle_2K5 'Red Storm Rising',16.99,'Tom','Clancy', 200
When we execute the stored procedure with the provided parameters, the insert into the Authors table fails because of an invalid Commission Rating value. When this happens, execution is diverted to the CATCH block, which rolls back our transaction and inserts a row into our Application_Error_Log using the SQL Server 2005 supplied functions.
Conclusions
The new TRY...CATCH blocks certainly make safe coding easier for handling errors, including stopping error messages from ever making it to the client. While it may require a mind shift for many T-SQL programmers, it's one feature that was desperately needed. Keep in mind that by migrating your SQL Server 2000 code to 2005, you may have to change your application if was already designed to handle errors that are shipped to the client.Generally Used Shortcut Keys
Windows shortcut keys| F2 | Select a file and press F2 to rename the file |
| F3 | In Windows Explorer and on Desktop, pressing F3 brings up the Find dialog box |
| Alt + Enter | Select a file and press Alt + Enter to bring up its Properties dialog box |
| Alt + Space bar | Inside a window, press Alt + Spacebar to bring up the system menu of that window |
| Ctrl + Escape | Brings up the windows start menu |
| Alt + Tab | Lets you switch between currently running applications |
| Shift + Delete | Permanently deletes a file without moving it to Recycle Bin |
| Ctrl + A | Selects all the files in Windows Explorer. Also selects all the text in text boxes |
| Alt+ F4 | Closes the current window |
| Double left click | Double left click on the system icon of a window closes that window |
| Ctrl + Tab | Changes the tabs in a tabbed dialog box in forward direction. Also switches windows in an MDI form |
| Ctrl + Shift + Tab | Changes the tabs in a tabbed dialog box in backward direction |
| Ctrl + F6 | Switches between the currently open child windows in an MDI form |
| Ctrl + Left click | Deselects a specific item from a selected range. Works in Windows explorer |
| Crtl + Alt + Delete | Brings up task manager in Windows 95/98. Brings up more options in NT/2000 |
| Shift + F10 | Brings up the context sensitive pop-up menu |
| Ctrl + W | Closes the current window |
| Windows Key + m | Minimizes all windows |
| Ctrl + (+) key from the right hand side of the keyboard | Rearranges the widths of the list view's columns properly |
Visual studio shortcut keys
| F2 | Brings up the 'Object Browser' window |
| F3/F4/F6/F11 | Brings up the 'Properties Window' for the current form/control |
| F5 | Executes the current project |
| Ctrl + F5 | First checks for syntax errors and then executes the project |
| F7 | Opens the code window for the current control |
| F8 | Executes the project in 'Step mode'. Keep pressing F8 to execute the next statement; Press F5 to come out of step mode |
| F9 | Inserts break point at the current line in the code window. Press F9 again to toggle the break point |
| Ctrl + G | Brings up the 'Immediate window', which is useful for debugging purposes |
| Ctrl + Spacebar | While writing code, this combination helps you see the available options/methods/properties based on what you are typing |
| Ctrl + J | Same as above... |
| Shift + F2 | Place the cursor over any function call and press Shift + F2 to see the declaration of that function |
| Ctrl + F | Brings up the find dialog box |
| Ctrl + H | Brings up the replace dialog box |
| Shift + F3 | Finds the previous occurance of a string |
| Ctrl + Shift + F9 | Clears all break points |
| Ctrl + Delete | Deletes to the end of the word |
| Crtl + Y | Deletes the current line of code |
| Ctrl + Z | Undoes the last change in the code window |
| Ctrl + Up/Down arrows | Helps you move between procedures/functions in the code window |
Internet Explorer shortcut keys
| Ctrl + F | Brings up the Find dialog box |
| F5 | Refreshes the page |
| Ctrl + N | Opens a new browser window |
| Alt + Home | Takes you to your homepage |
| Escape | Stops loading the current page |
| Ctrl + A | Selects the entire page |
| F11 | Toggles between full-screen mode and normal mode |
| Backspace | Takes you to the previously loded page |
| Alt + Right arrow | Forwards you by one page in the available page stack |
| Alt + Left arrow | Takes you to the previous page in the available page stack |
| Ctrl + Enter | In the address bar, avoid typing http, ://www and .com by just typing the domain name and pressing Ctrl + Enter |
| Enter | Not sure if the domain name ends with .com or .net? Type the domain name & press enter. IE will search for the domain |
| F4 | In IE 5.0, F4 drops down the address bar combo box |
| Ctrl + P | Prints the current page |
| Crtl + O | Brings up the 'file open' dialog box |
| Ctrl + H | Brings up the History window |
| Crtl + B | Brings up the 'Organize Favorites' dialog box |
| Ctrl + R | Reloads/refreshes the current page |
| Shift + Left click | Opens the clicked link in new window |
Outlook shortcut keys
| Alt + S | Sends the current mail |
| Ctrl + Enter | Sends the current mail |
| Ctrl + K | Resolves the email addresses from the address book |
| Alt + K | Resolves the email addresses from the address book |
| F7 | Starts spell check |
| Ctrl + D | Deletes the current mail |
| Shift + Delete | Permanently deletes the current mail |
| Ctrl + Z | Undoes the last change |
| Ctrl + Y | Redoes the last change |
| F4 | Brings up the Find dialog box |
| Shift + F4 | Finds the next occurence of the search string |
| Ctrl + R | Brings up the reply window for the current mail |
| Ctrl + Shift + R | Brings up the 'reply all' window for the current mail |
| Ctrl + P | Prints the current mail |
| F5 | Sends and receives mails |
