
November 22, 2006
Using Visual SourceSafe for ASP.NET
Walks through the complete process of managing your ASP.NET projects using Microsoft Visual SourceSafe.Contents
Why Source-Code Control
Set Up Your SourceSafe Database
Adding Your ASP.NET Solution to VSS
Retrieving Solutions from Visual Studio .NET
Some developers believe that source-code control is a necessary evil. Yet, source-code control is a sound business practice supporting your software development process. In this article you will be shown a real-world step-by-step approach to effectively using Microsoft® Visual SourceSafe® as your source-code control mechanism. You will be shown how to create a new SourceSafe database, how to check in and check out files, and how to create releases using labels.
Why Source-Code Control
From a simplistic perspective, a Software Configuration Management (SCM) product, like Visual SourceSafe (VSS), is a central library, or database, of documents that make up a project. Visual SourceSafe can store any stream of bits, such as project plans, specification documents, database objects, source code, and any other artifacts of your project. As a best practice, all project artifacts, not just source code, should be contained in a Visual SourceSafe database for easy access, sharing among team members, and most importantly, for version control.
As in any library, the ability to "check out" a file for use is necessary. By checking out a file, a user can edit the file. Typically, only one person can check out and edit a file at a time. As a best practice, ensure that only ONE person can ever have a file checked out. In our research for this article, we reviewed some white papers that offered scenarios of Visual SourceSafe use recommending that multiple users could check out the same file. They recommended that all changes could then be merged back together. While this may appear somewhat easy to do using the tools built into VSS, in actual practice it has several drawbacks. It takes longer to check items back in, could lead to someone having to manually check conflicts in the merge process, does not generally work with binary artifacts such as databases, Microsoft® Word documents, and so on, and does not always reflect the accurate history of who updated what and when.
VSS allows the administrator of the library to define its access control. Users are given access IDs and passwords, plus access rights. Access rights may be as simple as read or read/write capabilities, or as complicated as functional rights. A functional right, for example, is the ability to delete files.
Knowing what has happened to each and every file (source code, project plans, requirements, and so on) through its lifecycle is a very important feature. VSS keeps a history of all activity, such as when a file was created and by whom, each revision to that file, notes or comments about that file, and other information to help you track the lifecycle of that document.
The VSS features mentioned above, and many more, allow you to effectively manage the development, build, and maintenance process in a structured, well-managed approach. These are just some of the reasons why the use of VSS will help make your software development much more productive.
Set Up Your SourceSafe Database
Now that you have a good overview of Visual SourceSafe and understand the benefits of using it, let's learn how to get started. The first step is to identify a location for your centralized VSS database. The database is not a database in the strict sense of the word. It is simply a folder on a hard drive. This folder should be placed onto a network share where all developers can locate it. If you are a single developer, this could even be put onto your local hard drive.
If you have not already done so, install the VSS Administration tools from your VSS CD. You need to choose these options through the custom install. On the CDD you will typically run the ACMBoot.exe to allow you to install the Administration tools. Under the Custom options for the install, you will need to choose Administrative Programs and Create SourceSafe Database options.
After installing the Administrative programs, you may now go to your Start menu. Click Programs Microsoft Visual SourceSafe Visual SourceSafe 6.0 Admin. This will launch an interface from which you can click Tools Create Database... . You will see a dialog box that looks like Figure 1. Type in the location where you wish to create this new SourceSafe database, such as "D:\MyVSSDB" or file:////SharedDrive/MyVSSDB.
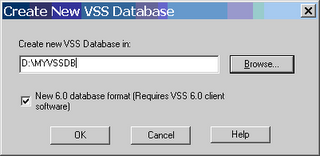
Figure 1. Specify the location of a shared folder to be used for all your SourceSafe files.
After the database is created, you will see a dialog that looks like Figure 2. This is just a warning that when this SourceSafe database is created, the Admin user that is created has no password associated with it. Be sure to assign a password to the Admin user by clicking on the Admin user and clicking Users Change Password... from the menu.

Figure 2. Secure your Administration tool by assigning a password to the Admin user.
After you have created the database, you will now be in the Visual SourceSafe Administrator tool (Figure 3). This tool only allows you to connect up to one VSS database at a time. You must create all the users in this database that will be allowed to check out and check in files from this database. For each database that you create, you will need to add the appropriate users. This is a nice feature in that only the users that you set up are allowed into this database; however, if you have multiple VSS databases that you wish to grant all users access to, you will need to set up each user individually in each database.

Figure 3. The Administrator tools allow you to create new users, create databases, lock databases, and perform other system administration functions for SourceSafe.
You should now add yourself as a new user to this database. Make sure you use your domain logon ID (without the domain name) as the user name in SourceSafe. SourceSafe will pick up your domain logon ID and attempt to use it to log on without prompting you. If you assign a Password to this VSS database, again, make sure it matches your domain password.
Remember the location of this new database; once you've added users with their domain names to the database, you will need to tell everyone where it is so they can locate it when they first set up their VSS client utility.
Adding Your ASP.NET Solution to VSS
Now that you have created a VSS database, you can add projects and project artifacts to this database. There are a couple of different methods you can use to manipulate this VSS database. You can use the VSS Explorer tool. This tool is useful for adding the "other project artifacts" to your database. You can also use VSS from within Visual Studio .NET. In fact, for adding new projects to VSS, it is recommended that you use Visual Studio .NET to add them. Using the Visual Studio .NET interface will add some binding information to your .SLN file so other developers can get hooked up to VSS automatically upon getting the solution from VSS
Assuming that you have downloaded and installed the ASP.NET Portal Starter Kit, you will now learn how to add this solution to VSS. With the solution open in Visual Studio .NET, select File Source Control Add Solution to Source Control... from the menus as shown in Figure 4.
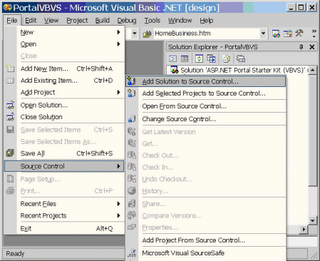 Figure 4. Add solutions to SourceSafe using the menus built into Visual Studio .NET.
After selecting this menu item, you will most likely get the dialog shown in Figure 5. If you are using the isolated development mode, this just means that you will now reference all your files using normal file URLs instead of FrontPage Server Extensions. Go ahead and click the check box Don't' show this dialog box again (Always allow addition of Web projects using File Share access to source control), and then click Continue.
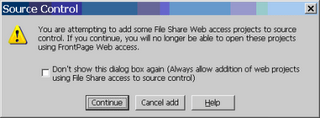
Figure 5. Switching from FrontPage Server extensions to using file share access
You will now be prompted for your logon ID and password (see Figure 6) that you created when you set up your VSS database. Type in JohnD (or whatever you used) and any password that you set up. You will then need to click Browse... to locate the specific folder where you created your VSS database. When you are finished, click OK.
Figure 6.VSS logon
Visual SourceSafe will now prompt you for the project name to create in the database. This first dialog, Figure 7, "Add to SourceSafe Project," will refer to the Visual Studio .NET project where the solution file resides. Enter the name for this project such as, ASP.NET Portal Starter Kit (VBVS).
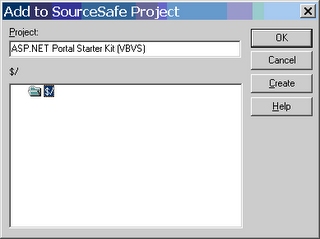
Figure 7. Give your project a name that will make it easy for you and other developers to locate later on.
VSS will prompt you for each and every Visual Studio .NET project in your solution. VSS will automatically add each Visual Studio .NET project name into the textbox in the Add to SourceSafe Project dialog box as shown in Figure 8. In this case, the second prompt will be PortalVBVS. Be sure to click the folder, "ASP.NET Portal Starter Kit (VBVS)" to place this project under this solution.
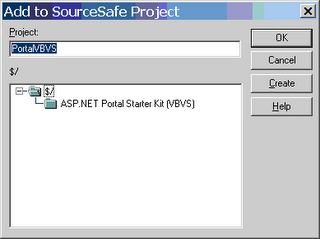
Figure 8. Add each new project to VSS individually.
VSS will warn you that the solution file is located in the same folder as the project. This is exactly what you want to do, so go ahead and click the check box and continue on. You may or may not get the dialog shown in Figure 9. If you do, go ahead and check the check box and click OK. This just means that you are aware you have other items in the folder that are not a part of the project file and therefore will need to be added manually through the VSS Explorer tool. This might include documents or .SQL files that are in your folder but are now specified in the project file.

Figure 9. If you have more files or folders that are not referenced in your project file, you will be informed of this by VSS.
Now that your solution and your projects have been placed under SourceSafe control you will see that Visual Studio .NET now uses special icons to show whether the file is locked or checked in as shown in Figure 10. Visual Studio .NET will display a lock icon next to each file under source-code control. You will see a check mark next to any file checked out to you, and a circle icon when a file is checked out by another user.
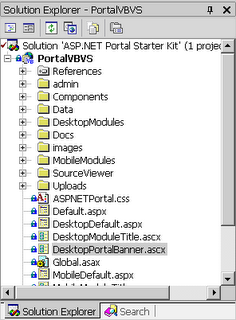
Figure 11. The Visual SourceSafe Explorer allows you to view the complete project and all of the files that have been placed under source-code control.
Retrieving Solutions from Visual Studio .NET
Once your project lead has created the initial solution for the application you are building, you will want other developers to be able to retrieve this solution and set it up on their computers. You do not want each developer to have to recreate the virtual directory on their computer and ensure that all of the files get into the proper locations. Luckily, VSS and Visual Studio .NET will take care of this for you.
Visual Studio .NET integrated with VSS will create the appropriate folders on your hard drive for you, create a new virtual directory, and copy the files down from VSS into the new folders for you. You should make sure you always do this process through Visual Studio .NET and not through VSS. Otherwise you will have to manually configure IIS and set references to the VSS database yourself.
To follow the next steps, you will need to be a developer on another machine (or you need to wipe out the virtual directory you created earlier). Open a new instance of Visual Studio .NET. Click File Source Control Open from Source Control... and you will see a dialog as shown in Figure 12. Click the PortalVBVS project in the window. Type in a different folder name in the Create a new project in the Folder text box and click OK.
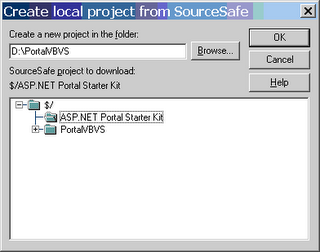
Figure 12. Retrieving a SourceSafe project into a new folder
If you choose a folder that does not exist on your drive (and it shouldn't) you will be prompted to create the folder. Click Yes All to create all folders necessary for this project.
Next you will be prompted for the virtual directory under which you wish to place this project, as shown in Figure 13.
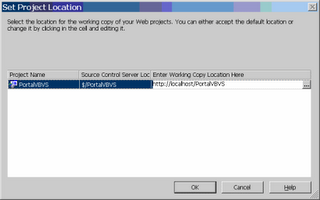
Figure 13. Assigning a virtual directory to the project
Depending on how your project and solutions are laid out in SourceSafe, you may be prompted for the solution file to open. If so, choose the .SLN file from the dialog. With the Portal solution, the .SLN files are in their own separate folder, so SourceSafe might not prompt you.
Next, Visual Studio .NET will prompt you for the location in IIS where you wish to create this virtual directory. Enter the Web server name and virtual directory name and click OK.
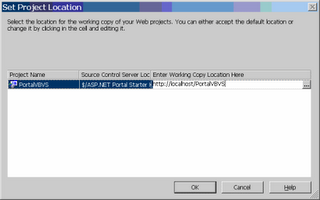
Figure 14. Assigning the project to a Web server
Now Visual Studio .NET will start bringing down all of the files for this project. In the sample that is in this article, I used D:\PortalVBVS. This means the solution will be stored in this folder. All of the other files for this project are placed in whichever folder your default Web site is pointing to. This folder is usually c:\inetpub\wwwroot. The project is now set up on this other developer's machine and is ready to be used. They can simply select the start page for the site and press F5 to run the application. They can now start checking out files and work on them, and check them back in—all from within Visual Studio .NET.
1 Comments:
Dear sir,
Your VSS posting information was very use full for me.
Thanks
Shahana
Pathfinder
Post a Comment
<< Home